


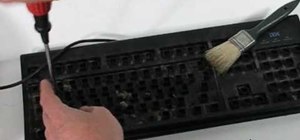
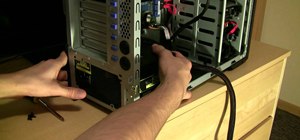
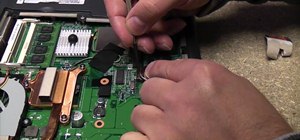
First of all the tutor suggests that this tutorial is easy and you can complete it only fifteen minutes. However you need to use proper anti-static precautions when you are performing this upgrade. You have to ensure to discharge static electricity before beginning. You must also work on a static free surface. You need a "#00 Philips screwdriver" which you can find in the "Newer Technology" 11-piece tool kit. It is available from macsales.Gather all your materials and then shut down your computer and then unplug all cables. Place your computer on static free surface. First open the side access door. To do this lift the latch located on the rear of the 'macpro', then tilt the door forward slightly and then remove it. You can see the four hard drives base located at the top of the center section. The old hard drive is located in the left most bay. You can add another one at one of the remaining bays. You can grab the lid of the tray and then gently pull it out to remove it. You can see the four screws on the tray. These screw line up with the four screws at the bottom of the hard drive. You have to line up the screws accordingly. With the static face of the hard drive facing away from you, line up the screws and then tighten them. Now push in the tray with the hard drive back in the bay making sure that it is firmly seated. Now attach the side door and close the latch. Now boot your computer and 'detect' and 'format' it. That's it.
Just updated your iPhone? You'll find new emoji, enhanced security, podcast transcripts, Apple Cash virtual numbers, and other useful features. There are even new additions hidden within Safari. Find out what's new and changed on your iPhone with the iOS 17.4 update.


Be the First to Comment
Share Your Thoughts