


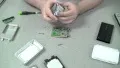
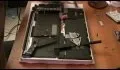
To install a hard drive in a 13" (13 inch) Macbook Pro laptop computer released in 2009 you will make sure to first transfer all data off the drive then discharge any static electricity from your hands making sure your are in a static free work environment. Next you will remove the old hard drive, to do this flip over the laptop and remove the 10 screws around the edge of the device with a #00 Phillips screwdriver starting with the three longer screws on the top right. Next, lift off the bottom cover and set it aside, you will see the drive in the lower left. Remove the retaining bar and lift out the drive with the plastic tab, slide off the SATA connector and remove the four mounting screws with a T6 Torx screwdriver, then peal off the plastic tab. Now you will install the new drive. Attach the tab to the new drive, attach the four mounting screws, attach the SATA connector and slide the unit into place, and reattach the retaining bar. Finally, set the bottom cover back into place begin by installing the three longer screws on the top edge then the remaining screws. Flip over the Macbook and turn it on.
Apple's iOS 26 and iPadOS 26 updates are packed with new features, and you can try them before almost everyone else. First, check Gadget Hacks' list of supported iPhone and iPad models, then follow the step-by-step guide to install the iOS/iPadOS 26 beta — no paid developer account required.


Comments
Be the first, drop a comment!