


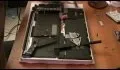
In this how-to video, you will learn how to install a hard drive into a 17" Macbook Pro. Make sure you use the proper anti-static precautions before going on with this procedure. You will need a pry tool, a Phillips screwdriver, and a T6 screwdriver. Make sure you transfer your old data into the new drive before installing. Shut down the computer and flip the laptop over. Unscrew the ten screws around the bottom. Now, remove the cover. You will see the hard drive at the lower right. Loosen the screws holding the retainers and remove the entire bar. Remove the hard drive using the plastic tab and disconnect the connector. Remove the screw in mounts with the T6 screwdriver. Remove the tab. Now, re-attach the mounts to the new drive. Replace the plastic tab onto the new drive and connect it to the laptop. Insert the drive into the compartment and screw in the retainer. Now, replace the cover and screws. Viewing this video will show you how to properly and safely install a new drive into your laptop.
Apple's iOS 26 and iPadOS 26 updates are packed with new features, and you can try them before almost everyone else. First, check Gadget Hacks' list of supported iPhone and iPad models, then follow the step-by-step guide to install the iOS/iPadOS 26 beta — no paid developer account required.


Comments
Be the first, drop a comment!