


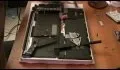
Other World Computing provides a guide for advanced users demonstrating the upgrade or replacement of a hard drive in a Mac Mini Server computer. This comprehensive video takes you through all steps from tool selection to re-assembling the Mac Mini Server and it is recommended that the video is watched right through before attempting the procedure. In particular, it demonstrates the difficulty of opening up a Mac Mini using a small putty knife. Once the case is off, the three wireless antennae are removed and then SATA cable disconnected. Next four screws need to be removed to allow the Hard Drive assembly to be detached from the main unit. Next the two drive trays are separated from the assembly and the SATA connector. Once the drives are separated from their drive trays the procedure is reversed and you will be given similar levels of detail to demonstrate the re-assembly process. Once complete, the Mac Mini Server is ready to be powered up with its new drives in place.
Related Products We may receive commission on purchases made using these links


Apple's iOS 26 and iPadOS 26 updates are packed with new features, and you can try them before almost everyone else. First, check Gadget Hacks' list of supported iPhone and iPad models, then follow the step-by-step guide to install the iOS/iPadOS 26 beta — no paid developer account required.


Comments
Be the first, drop a comment!